Egg-citing Morning
Hi hi hi, how ya doin? Many of you are familiar with Pinterest, (http://pinterest.com/mrsramsey/) and if you're not you should be. I have become quite the pinaholic, and decided to use my blog as a place to put my pins to use, a way of making sure that I'm not electronically hoarding all these ideas that I will never visit again. So, why not start of with of the most strange and unattractive idea's I've found. DIY Egg Face Mask!
To begin, you will need two eggs, 1 Kleenex, pure honey,
and Witch Hazel is optional.
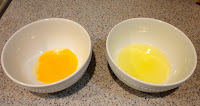 Separate your eggs into two bowls, one with the egg whites and one with the egg yolks. The whites you will use for your face mask. (Do what you please with the yolks, I might try a hair treatment, eh... or i might eat them! :) YUM)
1.Take your bowl of two egg whites (The egg whites are great to whiten your face by shrinking your pores and balancing the oils in your skin).
 2. Add, 1 Tablespoon of honey to your two egg whites (Honey promotes new tissue growth. Before pasteurization, which is why you need pure honey, it contains bee pollen, propolis, and other components that stimulate the growth of new skin).
 3. Lastly if you so choose, add 1 Teaspoon of Witch Hazel (Witch hazel is a natural product that is pretty inexpensive, I got mine from the local Wal-Mart, yet very good for your skin. It is actually good for all types of skin and is not drying or harsh. It is used in this recipe to close pores.)
 4. Once you have all your goodies in the bowl whisk together to make a semi-frothy mixture.

5. At this time I would advise you to go to the bathroom sink
to use both the mirror and the sink to drip in. Don't be scared, it'll feel Egg-stra gross at first, but just think of the results! :)
 6. Grab one tissue and separate it, most tissues are two ply, if not I suppose you could use toilet paper.
7. Get a good finger full of your egg mixture and apply liberally to your face, after applying tear tissue into small/medium parts and place over your face. (Leaving space of course for your mouth and eyes.
8. After your face is covered in tissue, layer another time with your egg mixture. If you choose you can do 2 or even 3 layers for a deeper clean. For this demonstration I only did one layer of tissue.
9. Wait 25 min + - for the mask to dry.

10. Go write a blog, go unload the dishwasher, read a book, call your momma, heck...go on a quick bike ride.
 11. After your mask in completely dry, it is peel off time. Start from the top of your forehead and peel down towards your chin. (I'm not join' to lie to you, it's going to sting a little as you peel, but that just means it's working!) Have a warm, damp wash cloth ready to dab your face with, in case you have excess goo.


12. Wah-LAH! Egg-cellently clean skin, shrunken pores, and a beautiful face.
13. Add your favorite moisturizer if you feel so inclined, I suggest Clinique, Moisture Surge. It's my fav.
THE END. Depending on how the hair treatment goes with the egg yolks, I may or may not post. I'm off, see ya! XO
To begin, you will need two eggs, 1 Kleenex, pure honey,
and Witch Hazel is optional.

1.Take your bowl of two egg whites (The egg whites are great to whiten your face by shrinking your pores and balancing the oils in your skin).
 2. Add, 1 Tablespoon of honey to your two egg whites (Honey promotes new tissue growth. Before pasteurization, which is why you need pure honey, it contains bee pollen, propolis, and other components that stimulate the growth of new skin).
 3. Lastly if you so choose, add 1 Teaspoon of Witch Hazel (Witch hazel is a natural product that is pretty inexpensive, I got mine from the local Wal-Mart, yet very good for your skin. It is actually good for all types of skin and is not drying or harsh. It is used in this recipe to close pores.)
 4. Once you have all your goodies in the bowl whisk together to make a semi-frothy mixture.
5. At this time I would advise you to go to the bathroom sink
to use both the mirror and the sink to drip in. Don't be scared, it'll feel Egg-stra gross at first, but just think of the results! :)
 6. Grab one tissue and separate it, most tissues are two ply, if not I suppose you could use toilet paper.
7. Get a good finger full of your egg mixture and apply liberally to your face, after applying tear tissue into small/medium parts and place over your face. (Leaving space of course for your mouth and eyes.
8. After your face is covered in tissue, layer another time with your egg mixture. If you choose you can do 2 or even 3 layers for a deeper clean. For this demonstration I only did one layer of tissue.
9. Wait 25 min + - for the mask to dry.

10. Go write a blog, go unload the dishwasher, read a book, call your momma, heck...go on a quick bike ride.
 11. After your mask in completely dry, it is peel off time. Start from the top of your forehead and peel down towards your chin. (I'm not join' to lie to you, it's going to sting a little as you peel, but that just means it's working!) Have a warm, damp wash cloth ready to dab your face with, in case you have excess goo.

12. Wah-LAH! Egg-cellently clean skin, shrunken pores, and a beautiful face.
13. Add your favorite moisturizer if you feel so inclined, I suggest Clinique, Moisture Surge. It's my fav.
THE END. Depending on how the hair treatment goes with the egg yolks, I may or may not post. I'm off, see ya! XO


Comments
Post a Comment